How to expire posts in WordPress
In this tutorial we will tech you how to expire post in WordPress and what to do with it after it expires.

There are times when you have to make your posts expire. This can be due to many reasons, a deal that about to end or a contest that have a specific time limit. Even though you can do this manually but for that you have to keep a keen eye on the time. Today you will know about how to make your WordPress post expire automatically.
Why you need to expire posts in WordPress?
Under many circumstances you have to put an expiration time for your posts, like you have deals, coupons, Giveaways, Event that is about to start. All these kind of posts have no value after the time is over. You have to get rid of the posts after the time is up.
If you fail to do this, your viewers will get the information that are no longer useful. So it’s better to remove it, removing it manually can be an option but you setting an expiration time can make them expire at exact time and you don’t have to keep a track of time and manually do the things.
How to expire WordPress posts?
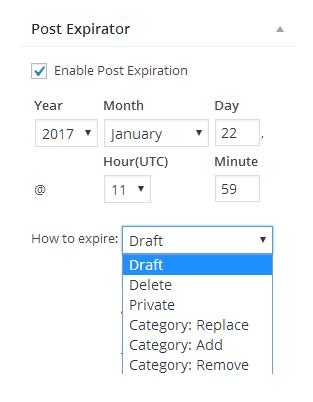
Now to begin with first you have to get a plugin called post expirator, what this plugin does is that till will help you add a field in your post screen where you can enter the time and date when you like the post to expire. But first install and activate the plugin, Now head to the post you like to expire go to edit mode of the post. Here you will see an additional panel which when enabled lets you choose an expiration date and time.

Here when you check the box enable post expiration then you will be able to set the time and date for the expiration of post, you even have to specify that what you would like to do with the post after it expires. You can move it to draft, delete, make it private. change category etc.
And hit update or publish, and you will have an expiration date on your post.
Bonus Tips: After the post expires, if you have set the expire option to delete the its good to have it redirect, you can use a redirect plugin, or make it nofollow beforehand so that Google does not index it, This is done for SEO purpose, 404 error page not found is not good for SEO.
Conclusion
This is how you put an expiration time on your WordPress posts. This is really simple to use and does the job automatically, If you liked this tutorial the feel free to check our tutorial section for more tutorials like this.
Also read:
- How to divide post into pages.
- How to use htaccess to block spam in WordPress
- How to add Nofollow tag to menu links in WordPress
- How to restrict authors in WordPress to a specific category
If you liked the post then please share it, and to ask a question or for starting a conversation use the comment section below.


